All Categories
Featured
Table of Contents
- – Rv Couch Bed Pomona, CA
- – OCRV Center
- – Replacement Rv Windows Pomona, CA
- – Remodeling Rv Pomona, CA
- – Rv Sofa Sleeper Pomona, CA
- – Replacement Rv Refrigerator Pomona, CA
- – Rv Sofa Beds Pomona, CA
- – Replacement Windows For Campers Pomona, CA
- – Rv Sofas Pomona, CA
- – Awnings For Trailers Pomona, CA
- – Rv Dining Table Pomona, CA
- – Rv Couch Pomona, CA
- – OCRV Center
Rv Couch Bed Pomona, CA
Just like the windows in your vehicle or home, there are a few different kinds. Possibly you desire a home window in your door to make sure that you can allow in the sun? Examine! The RV Access Door Obscure Glass Window is best for that, with the enhancement that you can have your personal privacy while still allowing the light.
And if you desire your windows to be tinted, we can aid you there. I'm certain you're aware of all that a home window can do.
Without the home windows to allow in the light to inform you whether it's evening or day, you can get all kinds of blended, perhaps also miss a big occasion. Or imagine you're having a cookout with your household and you run inside to obtain some more hot pets. Without a window, you would not have the ability to see that your child is obtaining extremely near to the fire and no person else has actually discovered yet.
Replacement Rv Windows Pomona, CA
The sun is a great designing tool to make use of, lighting up area and visually increasing it. All the most effective decorators recognize exactly how much of an effect lights can have. Whether you're using it to accentuate an impressive piece of art work or add heat to an entire space, lights makes all the distinction in a space.
If you have older windows that require replacing, the procedure for setting up the brand-new windows isn't as easy as it looks. You need to remove the inner frame of the old window by eliminating the screws. Then, you require to eliminate the external structure of the home window by pressing it out of the home window location.
When your area is tidy and complimentary of particles, examine the structural elements of the home window opening (Pomona Awnings For Trailers). If there is anything that requires fixed (rusted staples, for instance), make certain you repair them prior to mounting the brand-new window.
Once more, make certain you are using the aid of another individual to keep whatever straight and also and stop the window from falling. As soon as the external structure and the glass frame are in place, protect them by positioning and safeguarding the internal framework on the within the home window location.
Remodeling Rv Pomona, CA
Our company believe in providing the absolute best worth, high quality, and selection (Pomona Awnings For Trailers). Plus, we desire you to appreciate your acquisition! In case you desire to send out an item back to us, you might return most unused things for a reimbursement or exchange, minus shipping, within 90 days from the date of purchase unless kept in mind below under exceptions and exemptions
For web orders, please get in touch with our customer care group(1-888-626-7576) to ensure your return or exchange is documented and any potential concerns have actually been responded to. A return consent will certainly be offered, and, in every instance, we'll begin to maintain an eye out for your return. For web orders returned in-store, please take the item in original packaging, together with the invoice to any type of Outdoor camping Globe retail locations for a refund or exchange.
Rv Sofa Sleeper Pomona, CA
Refunds for internet orders released in-store are able to be reimbursed to a GIFT CARD or MAILED CHECK ONLY; some exclusions may apply. For retail purchases returned with an invoice, please return the unused and unopened thing, with the original sales invoice, for a complete refund or exchange. All returns with a gift receipt will get an installment plan for the amount of the item at the time of purchase.
When it comes to Motor home travel, having the best home windows can make all the distinction. Whether you're looking for better insulation, improved ventilation, or just a much better sight, there are a couple of crucial elements to consider when selecting the ideal Motor home home window for your car. Below are five pointers to assist you make a notified choice and appreciate your journeys to the fullest.
Replacement Rv Refrigerator Pomona, CA
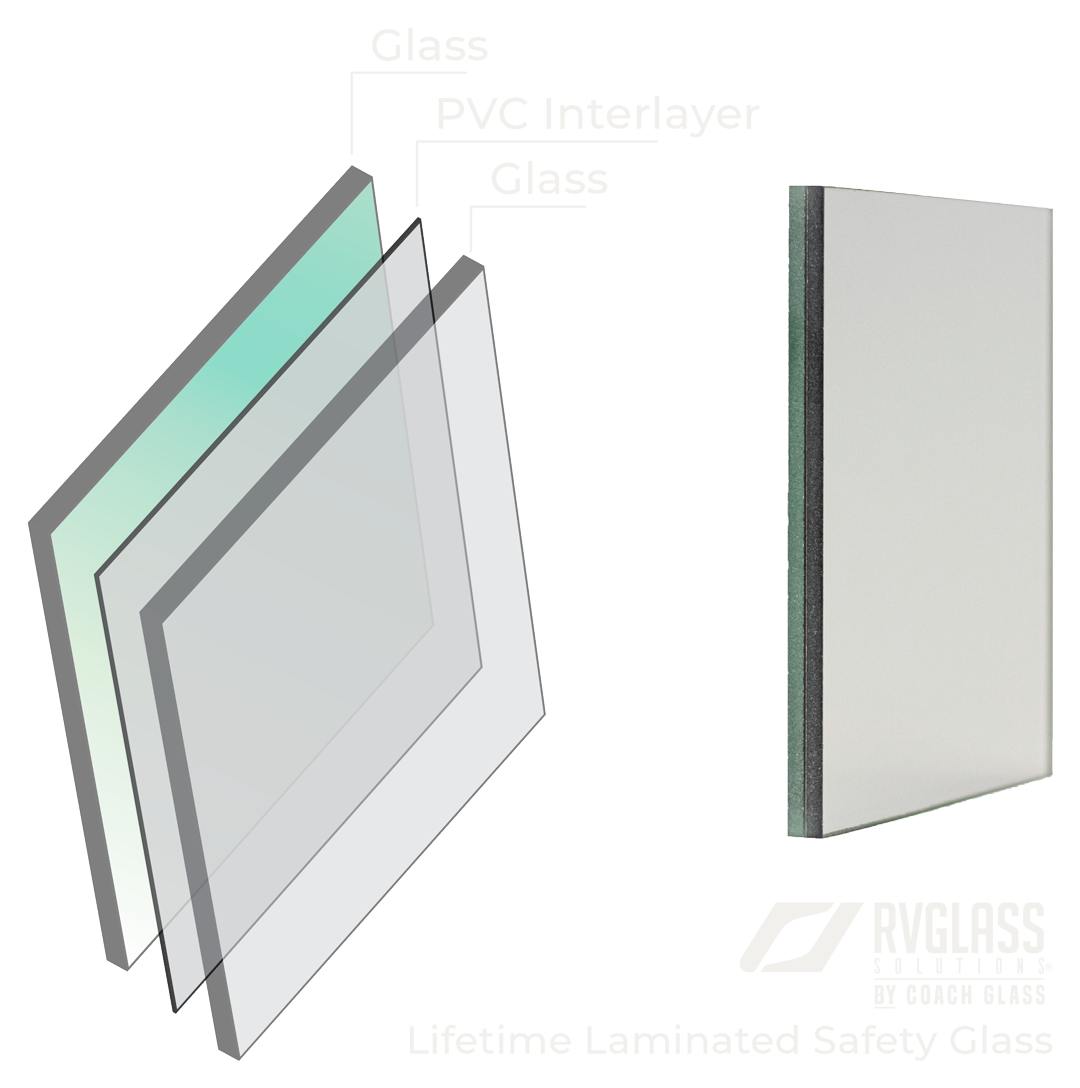
Fixed home windows are stationary and can not be opened, while gliding home windows can be opened up flat or up and down. Awning windows are pivoted on top and open outside, offering exceptional air flow. Think about the kind of home window that will certainly ideal match your needs and choices before purchasing. When choosing a recreational vehicle window, it's essential to seek high-grade products and construction.
Look for windows that are made from toughened up glass, which is stronger and extra immune to damage than normal glass. Additionally, the frame must be made from durable materials like light weight aluminum or vinyl, and need to be created to protect against leaks and drafts. Purchasing a high-quality RV home window will guarantee that it lasts for years and offers trustworthy efficiency on your travels.
The window ought to fit well right into the area supplied, without any type of voids or areas that can permit drafts or leakages. Procedure the opening meticulously and choose a home window that matches the measurements. In addition, consider the shape of the window and how it will fit with the general style of your recreational vehicle.
Rv Sofa Beds Pomona, CA
Your motor home's home windows are the secret to delightful camping, letting you see all the views of the roadway and your locations. If you're driving a motorhome, the windshield is the most essential home window overall RV. Regardless of which kind of motor home you have, your windows are a fundamental part of camping.
Older RVs were developed with much less advanced home window systems, so there is wear and tear that might be evident., yet specific concerns like fog, scratches, or concerns with the housing of the window might mean it's time to change your Motor home home windows.
There are fractures, deep scrapes, or chips in the home windows. Wind or water goes into the gear from around the windows, also when the home windows are shut. When replacing your Recreational vehicle home windows, you're able to pick the right home window for your Recreational vehicle and your needs.
Replacement Windows For Campers Pomona, CA
There are also alternatives such as clear glass, pebbled home windows, and colored RV home windows. Your design, safety, and window utilize requirements will help establish which kind of motor home home window you choose. Your recreational vehicle's home window frameworks combine the inside and exterior elements of your motor home, and they need to be properly mounted to guarantee that the sidewall's seal continues to be leak-proof.
The very best means to ensure that your RV home window replacements are set up effectively is to leave it to the professionals. Our motor home solution experts can replace any kind of home windows and glass on your motor home, consisting of the windshield, side home windows, and even the more complicated motor home door window substitute. Door windows, otherwise set up appropriately, can rattle when you're making use of the motor home door, so leave that repair to our specialists at Lazydays RV.
Rv Sofas Pomona, CA
These windows open exterior with a crank system, enabling air flow while lessening rain entry (Pomona Awnings For Trailers). Commonly bigger home windows that do closed, providing unblocked views and light if outfitted. Prior to we study the operation of RV home windows, it's important to understand exactly how they are set up. Here's a quick introduction of the elements involved in a regular home window installment: The key glass system.
Fasteners protecting the keeping ring. Provides a water tight seal around the home window. These components are set up on the assembly line quickly after the wall assembly, guaranteeing the structural stability of your motor home. While RV home windows vary from property home windows, they need normal focus and upkeep to avoid concerns like water leaks.
Awnings For Trailers Pomona, CA
Ensure to look for room-by-room screen elimination as needed. To guarantee the longevity and efficiency of your motor home windows, consider the complying with pointers: Analyze the location where the window fulfills the wall surface for any type of spaces or gaps. Clean the location thoroughly before applying silicone sealer. In extreme cases, you might require to remove the window and reinstall it making use of putty or foam seal.
We urge customers to verify the contents and seek advice from with their dealer or Keystone RV for the most present information. If you have any type of inquiries or need further explanation, please do not hesitate to call your dealership or connect to Keystone RV straight.
For those of you that are extra visual, you'll appreciate our step-by-step guide video clip, embedded below. If you prefer the created word, the steps are laid even more down the page. Or enjoy both! These are the devices we needed for our camper home window substitute. Relying on your recreational vehicle, you might or may not need all of these devices for your job.
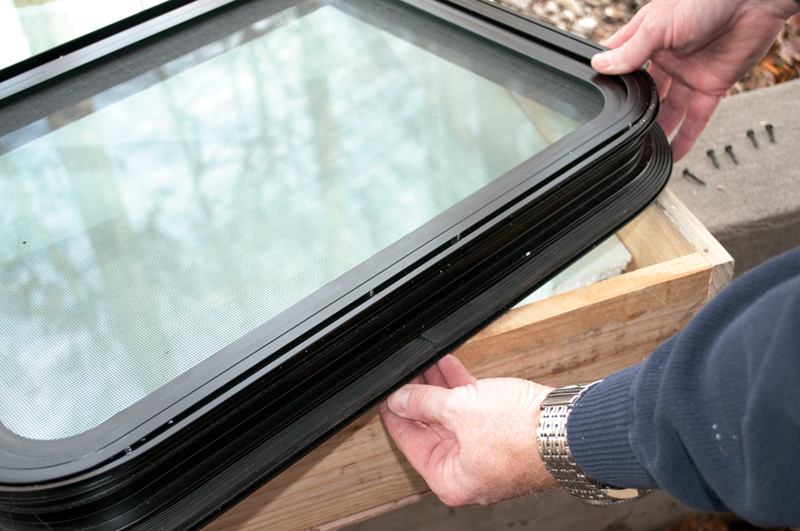
Regardless of where you purchase your new RV window, you'll require to supply exact measurements. Allow's break down our procedure for measuring a recreational vehicle window for substitute. Begin by getting rid of any home window frame, blinds, or tones. Next, eliminate all screws around the border of the window, and eliminate the within structure.
Rv Dining Table Pomona, CA
Do not put any outside pressure on the window while taking your measurements, or it could come loose and loss. For additional security, you might want to have an assistant on a ladder outside, holding the window in place while you gauge. Meticulously get rid of the frame of your old window so that you can gauge the opening (NOT the home window itself).
For our rectangle-shaped home window, we required to take only four measurements. It's an excellent concept to take measurements at a number of factors so you have an idea of how cleanly the window opening was reduced.
Rv Couch Pomona, CA
Next, determine the thickness of the wall surface (depth of the window), from the exterior wall surface to the indoor wall surface area. For this measurement, use your leader (with dimensions that run right throughout). Insert the ruler right into the wall surface until it touches the beyond the window framework.
Dimensions of the old home window and the home window opening are frequently various. They can differ as much as half an inch on the sides, leading, and bottom. Home window suppliers make use of filler strips to maintain the home window degree and snug. This is why it's so important to measure the opening and not the original window itself.
Take your time to obtain an accurate measurement, and confirm it by gauging a second time. Specific measurements are essential to RV home window replacement. Take a close look at your tape measure and be certain you understand which are the 1/16th-inch measurements.
OCRV Center
Address: 23281 La Palma Ave Yorba Linda, CA 92887Phone: (714) 909-1444
Email: [email protected]
OCRV Center
The home window suppliers are the ideal authorities on installing their items. The maker of your new Recreational vehicle window has most likely consisted of valuable guidelines or suggestions to make the installation much easier.
Rv Refrigerator Replacement Pomona, CARv Upholstery Pomona, CA
Replacement Rv Windows Pomona, CA
Awnings For Rv Pomona, CA
Rv Sofa Beds Pomona, CA
Rv Couch Bed Pomona, CA
Rv Sofa Sleeper Pomona, CA
Rv Carpet Replacement Pomona, CA
Replacement Windows For Rv Pomona, CA
Rv Replacement Awnings Pomona, CA
Rv Refrigerator Replacement Pomona, CA
Replacement Rv Windows Pomona, CA
Awnings For Trailers Pomona, CA
Rv Dining Table Pomona, CA
Rv Sofa Beds Pomona, CA
Rv Interior Remodel Pomona, CA
Awnings For Rv Pomona, CA
Rv Dining Table Pomona, CA
Rv Replacement Furniture Pomona, CA
Rv Floor Replacement Pomona, CA
Rv Restoration Companies Pomona, CA
Remodeling Rv Pomona, CA
Rv Carpet Installation Pomona, CA
Rv Couch Pomona, CA
Rv Replacement Awnings Pomona, CA
Remodeling Rv Pomona, CA
Rv Carpet Replacement Pomona, CA
Awnings For Trailers Pomona, CA
Rv Interior Furniture Pomona, CA
Rv Couch Pomona, CA
Rv Sofa Beds Pomona, CA
Replace Rv Flooring Pomona, CA
Rv Upholstery Pomona, CA
Rv Floor Replacement Pomona, CA
Replace Rv Flooring Pomona, CA
Rv Couch Pomona, CA
Replacement Rv Refrigerator Pomona, CA
Rv Microwave Replacement Pomona, CA
Replacement Windows For Rv Pomona, CA
Rv Floor Replacement Pomona, CA
Replacement Windows For Campers Pomona, CA
Rv Floor Replacement Pomona, CA
Awnings For Trailers Pomona, CA
Rv Sofa Sleeper Pomona, CA
Rv Sofas Pomona, CA
Rv Couch Bed Pomona, CA
Replacement Rv Windows Pomona, CA
Rv Dining Table Pomona, CA
Replacement Rv Refrigerator Pomona, CA
Awnings For Trailers Pomona, CA
Remodeling Rv Pomona, CA
Rv Dinette Booth Pomona, CA
Rv Floor Replacement Pomona, CA
Awnings For Trailers Pomona, CA
Rv Interior Furniture Pomona, CA
Rv Refrigerator Replacement Pomona, CA
Replacement Windows For Campers Pomona, CA
Rv Sofa Beds Pomona, CA
Rv Upholstery Pomona, CA
Rv Carpet Installation Pomona, CA
Replace Rv Flooring Pomona, CA
Remodeling Rv Pomona, CA
Rv Sofas Pomona, CA
Rv Chairs Pomona, CA
Rv Interior Remodel Pomona, CA
Rv Sofa Beds Pomona, CA
Rv Carpet Installation Pomona, CA
Rv Interior Furniture Pomona, CA
Replacement Rv Refrigerator Pomona, CA
Rv Couch Pomona, CA
Motorhome Carpets Pomona, CA
Rv Couch Bed Pomona, CA
Motorhome Carpets Pomona, CA
Rv Carpet Replacement Pomona, CA
Replacement Rv Refrigerator Pomona, CA
Rv Upholstery Pomona, CA
Rv Interior Remodel Pomona, CA
Rv Dinette Table Pomona, CA
Local Seo Marketing Company Pomona, CA
Best Seo Packages Pomona, CA
OCRV Center
Table of Contents
- – Rv Couch Bed Pomona, CA
- – OCRV Center
- – Replacement Rv Windows Pomona, CA
- – Remodeling Rv Pomona, CA
- – Rv Sofa Sleeper Pomona, CA
- – Replacement Rv Refrigerator Pomona, CA
- – Rv Sofa Beds Pomona, CA
- – Replacement Windows For Campers Pomona, CA
- – Rv Sofas Pomona, CA
- – Awnings For Trailers Pomona, CA
- – Rv Dining Table Pomona, CA
- – Rv Couch Pomona, CA
- – OCRV Center
Latest Posts
Tustin Best Vision Insurance For Seniors
San Clemente Employee Benefits Insurance Agency
Payroll Service For Small Businesses Newport Beach
More
Latest Posts
Tustin Best Vision Insurance For Seniors
San Clemente Employee Benefits Insurance Agency
Payroll Service For Small Businesses Newport Beach