All Categories
Featured
Table of Contents
- – Rv Trailer Roof Repair Rowland Heights, CA
- – OCRV Center
- – Repair Rv Roof Leak Rowland Heights, CA
- – Rv Roof Repair Fiberglass Rowland Heights, CA
- – Class C Rv Roof Repair Rowland Heights, CA
- – Rv Roof Maintenance Rowland Heights, CA
- – Rv Slide Out Roof Repair Rowland Heights, CA
- – Rv Roof Leak Repair Rowland Heights, CA
- – Resealing Rv Roof Rowland Heights, CA
- – Rv Roof Repair Rowland Heights, CA
- – Rv Trailer Roof Repair Rowland Heights, CA
- – Rv Trailer Rubber Roof Repair Rowland Height...
- – Rv Roof Repair Service Near Me Rowland Heigh...
- – Rv Roof Repair Near Me Rowland Heights, CA
- – OCRV Center
Rv Trailer Roof Repair Rowland Heights, CA
Lengthy tale short, Progressive paid our whole initial Estimate - COMPLETELY. They took up until last week to do it. This is the most awful insurance case we've needed to deal with. The consumer was extremely distressed due to the fact that they had Spring Damage outdoor camping plans, and we really did not understand if we would certainly have the ability to get the repairs done in time due to all the delays.

He called Progressive and should have been not-so-nice due to the fact that he obtained the adjustor's manager entailed. When the boss male talked with the customer, he was playing it up big. He stated in order to get the repair work done as soon as possible so they can make their journey, we might purchase parts overnighted and they would certainly cover it.
It was hard throughout. Without entering into all of it, we did the roofing our method - the correct way - and they didn't need the adjustor to come and examine it after tear-down. They permitted us to send out photos which, certainly, revealed the damage left after destroying the initial EPDM.
Repair Rv Roof Leak Rowland Heights, CA
Given all the problem Progressive had actually provided us over this fixing, we intended to hang onto the RV up until we were guaranteed repayment of the last $1,542.75 they had withheld for the roofing repairs. When we contacted them they sent out a screenshot of the request for payment to be provided, claiming they "wished it would certainly be sufficient." Since we actually liked this customer and he did have plans, we allowed the motor home leave the shop on 3/30/18.
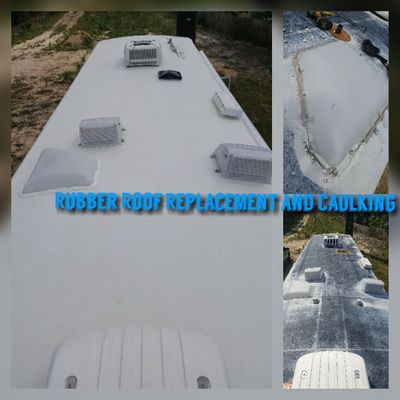
When we called them once more, they said they 'd stop repayment and provide a brand-new one. We Lastly got repayment 4/23/18. Images of roof covering with new substratum, and then finished.
Rv Roof Repair Fiberglass Rowland Heights, CA
Recreational vehicle roof repair work is essential. Neglecting it can compromise the honesty of your motor home traveling trailer or motorhome. And since dealing with a tear in your rubber roof covering is so easy, there's no reason to delay. Possibly you have actually uncovered from experience that RV rubber roof coverings and tree branches don't blend.
Due to its slow-moving aging rate in the sunlight, producers often give a 10-12 year guarantee on their EPDM rubber roofings. Many rubber roofs will see a life-span of 20+ years.
Class C Rv Roof Repair Rowland Heights, CA
The sealer seeps into fractures and openings and continues to be flexible as soon as dry. Currently I'll explain just how to apply a patch to the damaged location, then I'll talk about spot packages and Motor home roofing repair tape in much more detail.
Take a piece of EPDM rubber membrane and use a razor knife (or sharp scissors) to reduce a patch 2 inches larger than the broken area. Round the edges and leave no rugged edges. The spot over the damaged location and utilize a pen or pencil to draw a line around the spot, noting its area on your roof.
A scrub pad may be used on stubborn dirt, spots, sap, etc. Clean the base of the patch also.
Rv Roof Maintenance Rowland Heights, CA
Put down a bead of lap sealer over the edge of the patch. Once dry, your job is done and your motor home's roof covering should await rain. Spot packages make motor home roofing repair even much easier. Products like the Dicor Patchit Package include a piece of peel and stick EPDM rubber.
Simply stick the patch on and secure the side with the lap sealer. Recreational vehicle roofing repair spot set Tape is the most basic recreational vehicle roofing system repair work of all. EternaBond has actually been making a challenging self-sealing tape for a variety of years now. It's used much like any tape. Cut an item and lay it on your RV roofing system over the damaged location.
creates a long lasting watertight seal on a variety of surfaces, consisting of EPDM rubber, TPO, Hypalon, steel, a lot of PVC, ceramic tile, timber, and concrete (Rowland Heights Rubber Roof For Rv). It has superb UV security and is said to last more than twenty years. Motor home roofing fixing tape by Dicor Dicor, the leading maker of RV rubber roofing systems, has a self-sealing tape called Seal-Tite Tape
Rv Slide Out Roof Repair Rowland Heights, CA
It quits leakages instantly and has a long life period as well. As you would certainly when applying a spot, you'll need to get rid of all dirt and crud from your roofing system prior to applying the tape. Recreational vehicle roof covering fixing tape will certainly not comply with silicone, so any silicone caulking requires to be gotten rid of initially.
Much better to be secure than sorry and get it taken care of now. Self-Leveling Lap Sealer First, get rid of old caulking with a scrape tool, then clean the area to eliminate all dirt and crud. Use a cleaner that works with EPDM rubber, such as Protect All Rubber Roof Cleaner. Currently reseal the seam making use of a RV self-leveling lap sealer, such as Dicor Self-Leveling Lap Sealant, which continues to be adaptable when dried.
Rv Roof Leak Repair Rowland Heights, CA
As soon as completely dry, it has a smooth surface with a rubbery feel. These tapes are longer lasting than lap sealant, and when you have actually secured your joints with it, you most likely will never have to do it once again.
My Recreational vehicle roof covering that requires to be replaced! If you're like me and have more time than money, after that maybe your finest option is to buy an old RV and repair it up.
I get it. I bought my recreational vehicle over a year earlier and really did not have the guts to start tackling this task till today. Yet I'm here to tell you, if I can do it, you can do it. Can I really do it? Remain tuned and discover! I acquired this 1993 Jamboree for $5000.
Resealing Rv Roof Rowland Heights, CA
I have actually never functioned on a RV before and I have to admit, I'm afraid. Hopefully if you're thinking about doing this yourself, following along on my RV roof substitute task will offer you the courage to dive in! The tools I used today.
That seemed to be my least expensive alternative.
I figured I would instead have it semi-portable so I chose the cover, plus this permits me to change the height backwards and forwards when I need to. Obviously the cheapest option of all would certainly be to just toss an excellent tarp over the top of your RV for stormy days and just service warm days! Originally I raised the legs with 1 1/2 PVC pipe that fit inside the legs and afterwards I affixed a hose pipe clamp around the PVC pipeline to hold up the canopy legs.
Rv Roof Repair Rowland Heights, CA
I sawed 1 1/4 square legs from 24's to place inside the cover legs (once again holding the canopy up with pipe clamps.) and strengthening the 4 corners with an extra 24 screwed to it. This is still a little floppy. I most likely must have forked out for some rigid steel pipeline from the start.

An old spot work on the Recreational vehicle rubber roofing. As you can see, this roof has had a great deal of problems over the years.
On the bottom is the initial EPDM rubber roofing system layer. I understand it's EPDM rubber and not TPO rubber due to the fact that of the black support. On top of my EPDM roofing is a thin Recreational vehicle roofing system finish that was applied later.
I simply left the roof finishing stayed with the EPDM roof covering and pulled them up together. (You don't need to peel them up individually.) Beginning to peel off roof covering covering. Peeling off up area of the bottom layer of rubber. This reveals that the initial recreational vehicle roofing system was EPDM as a result of the black backing.
Rv Trailer Roof Repair Rowland Heights, CA
I reduced lines with an utility blade around components. All rubber roof removed from camper. This step went pretty quickly. There was a sticky under the lower layer of rubber that was still rather well stuck in many places, yet with a great little force it peeled up easily.
Currently I can see all the damaged plywood roof covering decking beneath. HEADS UP! You may not want to peel off the rubber! I selected to peel the rubber prior to eliminating fixtures simply so I might see what I was taking care of. But I have to warn you, the old adhesive was still sticky, and a pain to walk on.
Rv Trailer Rubber Roof Repair Rowland Heights, CA
If you believe you'll be conserving the roofing outdoor decking plywood (not changing it), after that you could save yourself some cleanup problem by getting rid of the components first and after that peeling up the rubber! Detail of water damage on camper roof. Much more water harmed areas on motor home roofing system decking. There was absolutely nothing actually terrible that made me really feel like I was going to fall through, yet definitely a great deal of damages and I was obtaining the feeling I would be changing a whole lot of the roof covering decking plywood.
I went for the simplest one first, a vent cap from a kitchen area sink plumbing air vent pipe. There is no various other method around this, you simply have to begin excavating till you expose the screw heads.
Unscrewing the screws in vent cap. The screws on this air vent cap were hex-head metal screws so I utilized a small socket motorist to remove them.
I uncovered an old wasp nest inside the air vent cover. This is a sight I'll possibly need to get made use of to, discovering the remains of pet habitation in every nook and cranny. I spend a dreadful great deal of my time producing great wild animals habitat in my lawn so I do not obtain upset when a creature selects to set up home in my motor home.
Rv Roof Repair Service Near Me Rowland Heights, CA
Thankfully no one was home in this old nest so I simply tossed it. You need to try not to damage these items (like air vent covers and caps) as you're scraping off the old caulk and sealant just in instance you need to utilize them once again.
One down, 7 even more fixtures to go. Next I made a decision to deal with the only roof covering ventilation follower that my camper has. My roof covering vent likewise had an air vent cover over it. I began scuffing the substance from those screws. Starting on the roofing system air vent. Equipment exposed on roof covering vent cap, the first nut came off clean.
The bolts on this Recreational vehicle roof vent cover were nuts on little screws. The 2nd one just began rotating, implying the screw was not fixed in location however transforming along with the nut. A peek at the hardware holding down the roofing system vent cover.
I didn't have any great way to hold the bolt in location so rather I chose to saw with the screws with a reciprocating saw. Sawing via screws on roof air vent cover. I utilized a cordless reciprocating saw with a metal-cutting blade yet it was challenging to obtain the blade flat sufficient to get to the bolts so near to the roof deck.
Rv Roof Repair Near Me Rowland Heights, CA
Bending the blade a little bit to reach close to the roofing deck. Cover removed from roof vent.
Many were so old and rusted that they sheared off when I loosened then with a great deal of pressure. Unscrewing the brackets that held the vent cover in position. I scraped a lot more caulk and roofing system sealant off the flange of the roof covering vent itself. I quickly uncovered there disappeared screws or equipment quieting so I gave up on the scraping and went inside the RV After scuffing the caulk and sealer from flange of roofing vent, say goodbye to screws! Unscrewing the inside cover plate of roof covering air vent follower in RV bathroom.
A couple sheared off with a great deal of pressure, yet two wouldn't budge. I had to pierce out the screw heads. I selected a drill bit near to the dimension of the shaft of the screws that I had actually currently taken out and began exploration. Picking a drill bit for piercing out a screw head.
OCRV Center
Address: 23281 La Palma Ave Yorba Linda, CA 92887Phone: (714) 909-1444
Email: [email protected]
OCRV Center
Safety glasses suggested. I pierced out the heads, one popped off and the other I was getting frustrated with and gave it a tug before it was pierced with. Instead of popping off the screw head, the plastic simply disappeared around the warm screw head. Whoops. Hope I do not have to reuse this cover.
Rubber Roof Installation Rowland Heights, CARubber Roof For Camper Rowland Heights, CA
Rv Fiberglass Roof Repair Rowland Heights, CA
Rv Roof Repair Fiberglass Rowland Heights, CA
Repair Rv Roof Leak Rowland Heights, CA
Rv Trailer Rubber Roof Repair Rowland Heights, CA
Best Rv Roof Repair Rowland Heights, CA
Rv Trailer Roof Repair Rowland Heights, CA
Best Rv Roof Repair Rowland Heights, CA
Rv Rubber Roof Replacement Cost Rowland Heights, CA
Rv Rubber Roof Replacement Rowland Heights, CA
Rv Trailer Roof Repair Rowland Heights, CA
Roof Repair For Rv Rowland Heights, CA
Rv Trailer Roof Repair Rowland Heights, CA
Rv Trailer Roof Repair Rowland Heights, CA
Rv Roof Repair Rowland Heights, CA
Rv Roof Leak Repair Rowland Heights, CA
Rv Roof Repair Fiberglass Rowland Heights, CA
Class C Rv Roof Repair Rowland Heights, CA
Roof Repair For Rv Rowland Heights, CA
Rv Roof Leak Repair Near Me Rowland Heights, CA
Class C Rv Roof Repair Rowland Heights, CA
Rv Roof Repair Rowland Heights, CA
Rv Roof Repair Service Near Me Rowland Heights, CA
Rv Roof Repair Near Me Rowland Heights, CA
Rv Fiberglass Roof Repair Rowland Heights, CA
Rv Trailer Roof Repair Rowland Heights, CA
Rv Fiberglass Roof Repair Rowland Heights, CA
Rv Roof Repair Near Me Rowland Heights, CA
Rv Trailer Rubber Roof Repair Rowland Heights, CA
Rv Roof Repair Rowland Heights, CA
Rv Roof Repair Near Me Rowland Heights, CA
Replace Rv Roof Rowland Heights, CA
Replace Rv Roof Rowland Heights, CA
Rv Rubber Roof Repair Rowland Heights, CA
Rv Slide Out Roof Repair Rowland Heights, CA
Rv Rubber Roof Repair Rowland Heights, CA
Rubber Roof For Camper Rowland Heights, CA
Motorhome Roof Replacement Rowland Heights, CA
Repair Rv Roof Leak Rowland Heights, CA
Rv Trailer Rubber Roof Repair Rowland Heights, CA
Rubber Roof Installation Rowland Heights, CA
Epdm Rv Roof Repair Rowland Heights, CA
Rv Roof Leak Repair Near Me Rowland Heights, CA
Rv Roof Replacement Rowland Heights, CA
Rv Rubber Roof Replacement Rowland Heights, CA
Motorhome Roof Replacement Rowland Heights, CA
Roof Repair For Rv Rowland Heights, CA
Rv Slide Out Roof Repair Rowland Heights, CA
Rv Rubber Roof Replacement Cost Rowland Heights, CA
Rubber Roof For Rv Rowland Heights, CA
Rv Fiberglass Roof Repair Rowland Heights, CA
Rv Roof Maintenance Rowland Heights, CA
Resealing Rv Roof Rowland Heights, CA
Rubber Roofing For Campers Rowland Heights, CA
Roof Repair For Rv Rowland Heights, CA
Resealing Rv Roof Rowland Heights, CA
Rv Rubber Roof Replacement Cost Rowland Heights, CA
Rv Trailer Rubber Roof Repair Rowland Heights, CA
Epdm Rv Roof Repair Rowland Heights, CA
Rv Rubber Roof Replacement Rowland Heights, CA
Rv Roof Maintenance Rowland Heights, CA
Motorhome Roof Replacement Rowland Heights, CA
Repair Rv Roof Rowland Heights, CA
Rv Trailer Rubber Roof Repair Rowland Heights, CA
Rv Roof Repair Near Me Rowland Heights, CA
Motorhome Roof Replacement Rowland Heights, CA
Replace Rv Roof Rowland Heights, CA
Rv Roof Repair Near Me Rowland Heights, CA
Rv Rubber Roof Maintenance Rowland Heights, CA
Repair Rv Roof Leak Rowland Heights, CA
Rv Roof Repair Service Near Me Rowland Heights, CA
Rv Roof Leak Repair Near Me Rowland Heights, CA
Replace Rv Roof Rowland Heights, CA
Roof Repair For Rv Rowland Heights, CA
Rubber Roof For Camper Rowland Heights, CA
Rv Roof Repair Service Near Me Rowland Heights, CA
Repair Rv Roof Rowland Heights, CA
Find A Top Seo Company Rowland Heights, CA
Find Seo Package Rowland Heights, CA
Rubber Roof For Rv Rowland Heights, CA
OCRV Center
Table of Contents
- – Rv Trailer Roof Repair Rowland Heights, CA
- – OCRV Center
- – Repair Rv Roof Leak Rowland Heights, CA
- – Rv Roof Repair Fiberglass Rowland Heights, CA
- – Class C Rv Roof Repair Rowland Heights, CA
- – Rv Roof Maintenance Rowland Heights, CA
- – Rv Slide Out Roof Repair Rowland Heights, CA
- – Rv Roof Leak Repair Rowland Heights, CA
- – Resealing Rv Roof Rowland Heights, CA
- – Rv Roof Repair Rowland Heights, CA
- – Rv Trailer Roof Repair Rowland Heights, CA
- – Rv Trailer Rubber Roof Repair Rowland Height...
- – Rv Roof Repair Service Near Me Rowland Heigh...
- – Rv Roof Repair Near Me Rowland Heights, CA
- – OCRV Center
Latest Posts
Evaporative Cooler Replacement Pasadena
Commercial Kitchen Hood Service Alhambra
Ac Troubleshooting North Hollywood
More
Latest Posts
Evaporative Cooler Replacement Pasadena
Commercial Kitchen Hood Service Alhambra
Ac Troubleshooting North Hollywood