All Categories
Featured
Table of Contents
- – Rv Ceiling Repair Silverado, CA
- – OCRV Center
- – Rv Repairs Near Me Silverado, CA
- – Rv Generator Repair Silverado, CA
- – Rv Ceiling Repair Silverado, CA
- – Rv Repair Centers Near Me Silverado, CA
- – Rv Generator Repair Silverado, CA
- – Rv Repair Service Near Me Silverado, CA
- – Rv Service And Repair Near Me Silverado, CA
- – Rv Repair Service Near Me Silverado, CA
- – Rv Service Repair Near Me Silverado, CA
- – Rv Refrigerator Repair Near Me Silverado, CA
- – OCRV Center
Rv Ceiling Repair Silverado, CA
We can deal with Dometic and Norcold recalls. We are certified Dometic and Norcold Service Warranty Centers. Please offer us a call with the make and design number, we will certainly take it from there!
Offered to certified purchasers based on lending institution credit report certifications. Legitimate only at getting involved outdoor camping globe locations. See supplier for details. Gap where banned. Costs are comprehensive of all offered price cuts. Federal government charges, state taxes, supplier charges and discharges screening costs as applicable will certainly be added to adhere to state automobile codes.
New unit photography for image purposes just. Stock and floorplans differ by location, not all promoted producers offered at taking part dealers.
Rv Repairs Near Me Silverado, CA
Might not be incorporated with any various other deal and not suitable to previous sales. Offer(s) valid at any Outdoor camping Globe Recreational Vehicle Sales or FreedomRoads dealership only. See supplier for information.
All rights reserved. FreedomRoads LLC, its relevant car dealerships and innovation partners are exempt for typographical mistakes in price or mistakes in description of condition of a car's recognized devices, accessories, price or warranties. Any and all differences should be dealt with before the sale of this car. Choice to offer a motor home despite price is exclusively identified by the selling supplier. * Best deal or $1,000 - deal has to be in creating and acquired from a qualified motor home dealer.
To get ensured trade-in value and/or evaluation, vehicle must remain in very same or considerably the exact same problem it remained in sometimes of offer. All offers are subject to evaluation. $1,000 cash money will be tendered in the form of cash money, check, or cash order. Not legitimate in LA or OR.
Rv Generator Repair Silverado, CA
Customer has to offer legitimate buyers order authorized by administration of contending dealership and correct paperwork detailing design year, make, brand, version, options, specs, shades, and vin # of advertised system. Purchasers order legitimate for 1 month from time of write. Completing dealership will certainly be any type of qualified recreational vehicle dealer as identified by the State in which the dealer operates and is not an Outdoor Camping Globe Recreational Vehicle Sales or FreedomRoads supplier.
Not appropriate to prior sales. See dealer for information. Not valid in The golden state.
Rv Ceiling Repair Silverado, CA
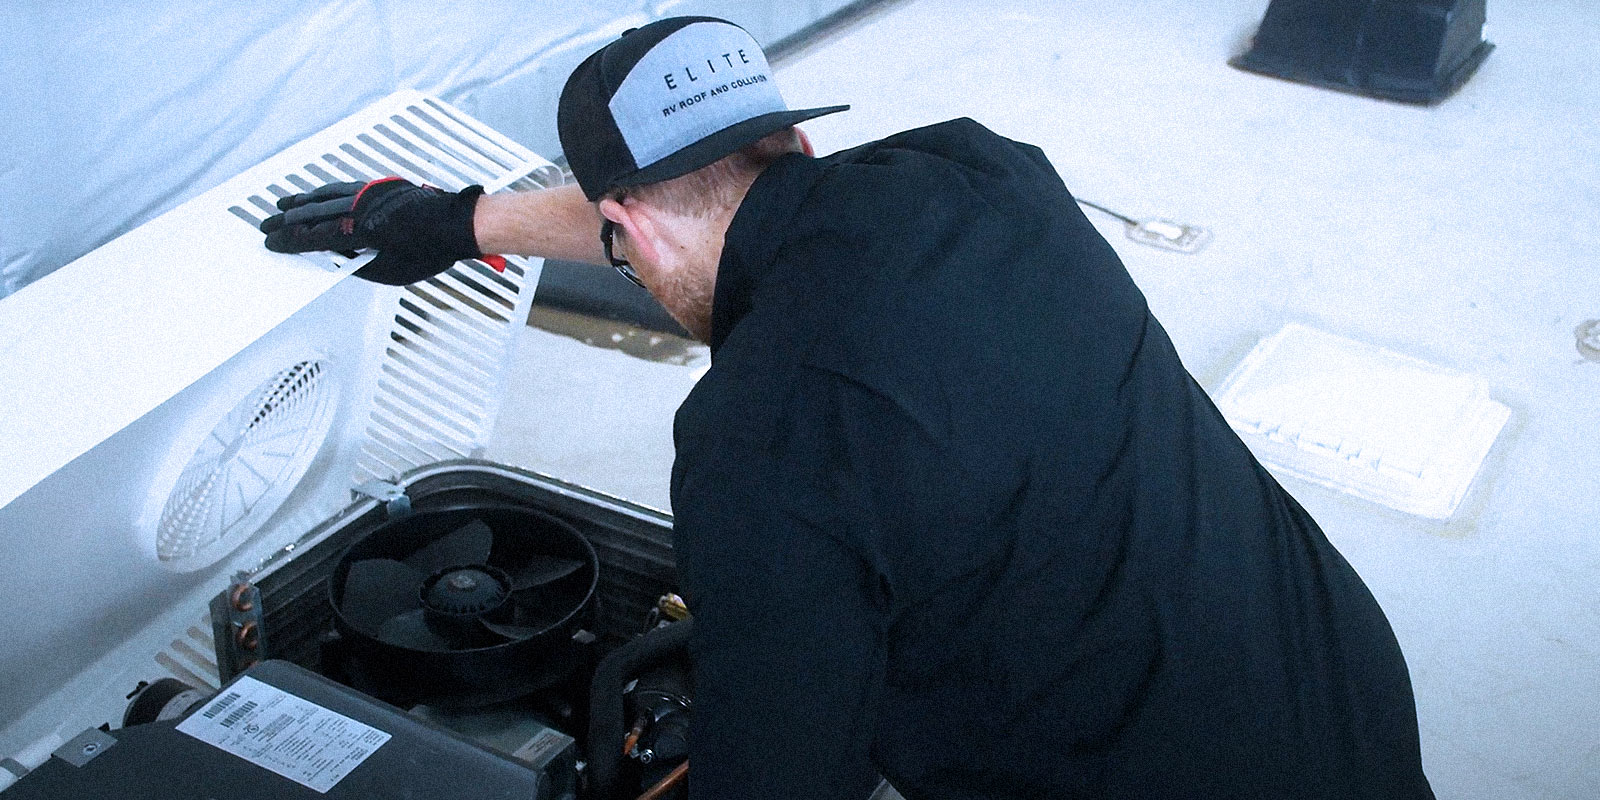
The brand-new Dometic a/c device was mounted with precision, sticking to supplier standards to ensure ideal performance and longevity. After installment, we performed a series of examinations to confirm that the new AC system was working correctly and efficiently. This step is critical to guarantee that the system will certainly execute dependably during future travels.
Whether you're intending a weekend escape to Yard of the Gods or a cross-country journey, making certain that your recreational vehicle systems are in prime condition is crucial. At Western Skies Mobile Motor Home Repair, we focus on providing expert motor home repair service and replacement services, assisting you delight in an easy RV experience. Motorhome Generator Repair Near Me Silverado. Contact us today to get more information concerning our services and how we can help with your RV needs
Rv Repair Centers Near Me Silverado, CA
Regular stop-and-go traffic on E-470 or Parker Roadway also increases wear. Our group is educated to identify and fix these particular, typical car AC troubles effectively. Worn seals or harmed hoses trigger refrigerant to leakage, which is one of the most usual reason your air conditioning strikes cozy air. The compressor is the heart of your AC.
At Christian Brothers Automotive Chester, we understand the importance of a correctly working vehicle air conditioning system. Our group of knowledgeable professionals is trained to identify and repair any problems with your car's air conditioner system. Whether it's a small repair work or a full air conditioner system overhaul, we have the expertise to get your automobile's air conditioner blowing cool once again.
Our well-informed specialists will certainly examine your a/c system to recognize any kind of leaks, worn-out components, or electrical concerns. With our cutting edge tools and quality components, we can successfully repair your automobile air conditioning system and recover your convenience throughout those warm summer season days.
Legitimate only at participating Outdoor camping Globe areas. See dealership for details. Government costs, state taxes, supplier charges and discharges screening charges as relevant will certainly be added to conform with state automobile codes.
Rv Generator Repair Silverado, CA
New system photography for illustration objectives only. Stock and floorplans vary by location, not all promoted manufacturers offered at getting involved suppliers - Motorhome Generator Repair Near Me Silverado.
May not be integrated with any kind of various other deal and not relevant to previous sales. Deal(s) legitimate at any Outdoor camping Globe Motor Home Sales or FreedomRoads dealership just. See dealership for information. 2025 FreedomRoads, LLC. OUTDOOR CAMPING WORLD and the Outdoor Camping WORLD Logo design are signed up trademarks of CWI, LLC. and made use of with permission.
All legal rights scheduled. FreedomRoads LLC, its relevant dealerships and modern technology partners are not responsible for mistakes in price or errors in summary of condition of an automobile's listed tools, devices, cost or guarantees. Any type of and all distinctions must be addressed prior to the sale of this vehicle. Decision to sell a RV regardless of cost is exclusively established by the selling supplier. * Finest deal or $1,000 - offer must remain in composing and acquired from a qualified recreational vehicle dealer.
To receive guaranteed trade-in worth and/or evaluation, car needs to remain in very same or substantially the very same condition it was in at time of offer. All offers undergo inspection. $1,000 cash will hurt in the kind of money, check, or cash order. Not legitimate in LA or OR.
Rv Repair Service Near Me Silverado, CA
Consumer has to offer valid customers order authorized by monitoring of contending supplier and appropriate paperwork outlining model year, make, brand, model, alternatives, specifications, colors, and vin # of promoted unit. Purchasers order valid for one month from time of write. Contending dealer will be any kind of accredited RV dealership as recognized by the State in which the dealer runs and is not a Camping World RV Sales or FreedomRoads dealer.
Any kind of suitable trade-in should be divulged and attended to evaluation at time of request. Not relevant to prior sales. See dealership for information. Not valid in California. Void where prohibited. For official Grand Layout RV refund terms, please visit .
Rv Service And Repair Near Me Silverado, CA
We can handle Dometic and Norcold recalls. We are certified Dometic and Norcold Service Warranty Centers. Please give us a telephone call with the make and version number, we will take it from there!
Is your automobile's a/c blowing cozy air or no air at all? If it's blowing, we'll ask you to come by for an Evac & Recharge service. A service technician will certainly make use of an unique machine to take the existing cooling agent out of your a/c and after that refill it with the proper amount.
Rv Repair Service Near Me Silverado, CA
Unpleasant mold and mold and mildew smells originate from your A/c vents. The Air conditioning operates only while the vehicle is in activity. If your vehicle's AC isn't running at peak efficiency, a check out to Diesel Power of Virginia Inc - Harvey's Transmissions is a wise step.
If your lorry's a/c starts to shed its cooling efficiency, think about a freon recharge. This quick and cost-efficient service brings back amazing air, offering remedy for the warm. Understand that if there's a freon leak, maybe due to a harmed pipe or seal, which could require extra extensive fixings.
The Thermal Development Shutoff or Orifice Tube is important for controling your AC system's stress and temperature, regulating the flow of cooling agent right into the evaporator. Appropriate balance avoids dampness build-up, critical for preserving your car's air conditioning performance. Never, at the very least not in the way you think about your oil being transformed.
Rv Service Repair Near Me Silverado, CA
Examine your guidebook for the specific quantity to prevent overfilling. It is recommended to have your engine running while charging your auto's A/C system. This is crucial as the A/C compressor, powered by the engine, should be energetic to assist in appropriate cooling agent circulation and ensure an efficient recharge. A cooling agent leak can bring about a loss of pressure in the air conditioner system, causing a failure to produce cold air.
Inspect RV furnace clean heater blower, combustion chamber and control compartment, getting rid of any kind of dust. Check RV hot water heating system flush holding storage tank, manually run pressure temperature relief valve and tidy burner tube (as outlined by the maker) as essential.
Examine the general condition of your AC unit(s). Tidy and straighten the RV Air conditioner evaporator and condenser coils.
Our service department is staffed with extremely educated specialists committed to making sure your RV remains in excellent working order for several years to find. Below at Wagner's Outdoor Express motor home, we understand that going out when driving and enjoying our great country is your priority, and we will certainly aid keep you traveling comfortably and style.
Rv Refrigerator Repair Near Me Silverado, CA
Give us a telephone call and we'll obtain you in and out of the store in an effective and prompt way, so you can return to experiencing the freedom that the recreational vehicle lifestyle provides. We are happy to offer high quality solution in the Falling Waters area. HAVE A LOOK AT OUR NEW SEAL TECHNOLOGY LEAK DISCOVERING SERVICE.
OCRV Center
Address: 23281 La Palma Ave Yorba Linda, CA 92887Phone: (714) 909-1444
Email: [email protected]
OCRV Center
Includes examination of tires, brake footwear and wheel bearings. Repacking and cleansing of the bearings. Inspect all outside lights. Check brake procedures. Suppliers suggest that you check your RV roofing system every year. We do the complying with services to maintain your roofing in excellent condition: Rubber roofing system cleaningApply UV-blocking treatmentPerform roof covering leakage checksRoof repairsRoof joints sealed Consists of roofing laundry, roofing system examination and roll/spray on roof covering conditioning therapy.
Rv Plumbing Repair Near Me Silverado, CARv Repair Service Near Me Silverado, CA
Motorhome Repair Shop Silverado, CA
Rv Repair And Service Near Me Silverado, CA
Rv Solar Installation Silverado, CA
Rv Plumbing Repair Near Me Silverado, CA
Rv Service Repair Near Me Silverado, CA
Rv Repair Services Near Me Silverado, CA
Motorhome Repair Near Me Silverado, CA
Rv Repair Service Near Me Silverado, CA
Rv Service Repair Near Me Silverado, CA
Rv Mechanics Near Me Silverado, CA
Best Rv Repair Near Me Silverado, CA
Rv Repair Shops Near My Location Silverado, CA
Rv Mechanics Near Me Silverado, CA
Rv Repair Shops Near My Location Silverado, CA
Rv Repair And Service Near Me Silverado, CA
Motorhome Repair Shop Silverado, CA
Rv Floor Repair Near Me Silverado, CA
Rv Mechanics Near Me Silverado, CA
Motorhome Service And Repair Near Me Silverado, CA
Rv Repairs Near Me Silverado, CA
Rv Service Repair Near Me Silverado, CA
Motorhome Service And Repair Near Me Silverado, CA
Rv Repair Services Near Me Silverado, CA
Motorhome Generator Repair Near Me Silverado, CA
Rv Repair Shops Near My Location Silverado, CA
Rv Floor Repair Near Me Silverado, CA
Rv Repair And Service Near Me Silverado, CA
Best Rv Repair Near Me Silverado, CA
Rv Floor Repair Near Me Silverado, CA
Rv Repair Service Near Me Silverado, CA
Motorhome Service And Repair Near Me Silverado, CA
Motorhome Repair Near Me Silverado, CA
Best Rv Repair Near Me Silverado, CA
Rv Ceiling Repair Silverado, CA
Motorhome Generator Repair Near Me Silverado, CA
Rv Ceiling Repair Silverado, CA
Rv Mechanics Near Me Silverado, CA
Motorhome Repair Near Me Silverado, CA
Motorhome Refrigerator Repair Silverado, CA
Motorhome Service And Repair Near Me Silverado, CA
Motorhome Repair Shops Silverado, CA
Motorhome Refrigerator Repair Silverado, CA
Rv Repairs Near Me Silverado, CA
Camper Ac Repair Near Me Silverado, CA
Rv Repair In My Area Silverado, CA
Rv Ceiling Repair Silverado, CA
Rv Repair Shops Near My Location Silverado, CA
Best Rv Repair Near Me Silverado, CA
Best Rv Repair Near Me Silverado, CA
Rv Service And Repair Near Me Silverado, CA
Rv Service Repair Near Me Silverado, CA
Rv Repair Places Near Me Silverado, CA
Motorhome Repair Shop Silverado, CA
Full Service Rv Repair Near Me Silverado, CA
Rv Delamination Repair Near Me Silverado, CA
Rv Repair Shops Near My Location Silverado, CA
Rv Service Repair Near Me Silverado, CA
Rv Repair In My Area Silverado, CA
Rv Solar Installation Silverado, CA
Motorhome Awning Repair Silverado, CA
Rv Repair Places Near Me Silverado, CA
Motorhome Awning Repair Silverado, CA
Rv Repair Centers Near Me Silverado, CA
Rv Generator Repair Silverado, CA
Camper Ac Repair Near Me Silverado, CA
Motorhome Refrigerator Repair Silverado, CA
Rv Delamination Repair Near Me Silverado, CA
Motorhome Service And Repair Near Me Silverado, CA
Rv Ceiling Repair Silverado, CA
Rv Repair Shops Near My Location Silverado, CA
Motorhome Repair Shops Silverado, CA
Camper Ac Repair Near Me Silverado, CA
Motorhome Repair Near Me Silverado, CA
Motorhome Generator Repair Near Me Silverado, CA
Full Service Rv Repair Near Me Silverado, CA
Rv Repairs Near Me Silverado, CA
In Seo Firm Silverado, CA
Near You Seo Marketing Silverado, CA
OCRV Center
Table of Contents
- – Rv Ceiling Repair Silverado, CA
- – OCRV Center
- – Rv Repairs Near Me Silverado, CA
- – Rv Generator Repair Silverado, CA
- – Rv Ceiling Repair Silverado, CA
- – Rv Repair Centers Near Me Silverado, CA
- – Rv Generator Repair Silverado, CA
- – Rv Repair Service Near Me Silverado, CA
- – Rv Service And Repair Near Me Silverado, CA
- – Rv Repair Service Near Me Silverado, CA
- – Rv Service Repair Near Me Silverado, CA
- – Rv Refrigerator Repair Near Me Silverado, CA
- – OCRV Center
Latest Posts
Mission Viejo Cheapest Insurance For Seniors
Health Insurance Plans For Family Laguna Niguel
Key Man Insurance Quote Rancho Santa Margarita
More
Latest Posts
Mission Viejo Cheapest Insurance For Seniors
Health Insurance Plans For Family Laguna Niguel
Key Man Insurance Quote Rancho Santa Margarita