All Categories
Featured
Table of Contents
- – Camper Roof Replacement West Covina, CA
- – OCRV Center
- – Camper Service Near Me West Covina, CA
- – Camper Awning Replacement West Covina, CA
- – Camper Repair Shop Near Me West Covina, CA
- – Rv Camper Repair West Covina, CA
- – Camper Air Conditioner Repair Near Me West C...
- – Camper Service West Covina, CA
- – Camper Repair Places Near Me West Covina, CA
- – Camper Service West Covina, CA
- – Camper Services West Covina, CA
- – Camper Roof Repair West Covina, CA
- – Camping Repair Near Me West Covina, CA
- – Pop Up Camper Repair West Covina, CA
- – OCRV Center
Camper Roof Replacement West Covina, CA
I located a bunch of water damages in the plywood under the fiberglass panel so I'll most likely be replacing it. Which indicates I'll end removing those edge trim items all the method down after all. But we'll obtain to that later on. I had a significant amount of water damage in the joint between the rounded corner and the roof covering deck.
The edge of the roofing outdoor decking is revealed at the back of the camper! I have actually exposed the roof substratum at the back edge of the camper. Get rid of some screws from the corner trim holding down the fiberglass panel.
Again, I tore that layer up too (there had not been much holding it down yet adhesive at this moment) and after that I could yank out the remainder of the rubber roofing that was glued underneath it. Currently I can take out the last bit of rubber roofing from below the fiberglass and luan plywood.
Camper Service Near Me West Covina, CA
I observed there were no bolts holding the roofing system plywood down. It was just glued. So I started carefully peeling it up. I could see heaven styrofoam insulation below the harmed locations of luan plywood on the roof. Notice there are no fasteners in any way holding back the roof covering plywood! It is entirely glued.
When I scraped up a few of the broken little bits I got hold of a solid piece of plywood and started to draw. The entire thing began to draw up cleanly in one item without damaging the foam board insulation in all. Now I can see the steel framing underneath. Yet after that the plywood started peeling up as one item, leaving all the styrofoam well undamaged.
There is a steel strengthened tape under that joins the pieces together. I don't recognize exactly how specifically they took care of to glue whatever down so well and get this tape joining them from the underside, however it was well done. The pieces of roof covering ply are joined together at the seams below with a metal-reinforced tape.
Camper Awning Replacement West Covina, CA
I swiftly recognized the roofing system was losing strength and tightness as I brought up the top layer, so split it off just prior to the first joint. A close up of the steel framing in the roof: one inch wide, one and a half inches tall. Below's an information of the wiring in the insulation foam and the strong wood supports where the antennas screw right into the roof.
Taking a look at the bottom of the roofing ply I removed you can see that it had an extremely full adhesive bond with heaven foam in-between, developing a solid lamination effect. Here is an image I made that details how the roof is constructed, how the roof covering mounting jobs, and just how all the layers are overlapped at the front and rear of the recreational vehicle rubber roof covering.
Camper Repair Shop Near Me West Covina, CA
Both most usual types of recreational vehicle awnings on rigs today are: Side-frame awnings, with upright framework sustains installed down the side of the motor home. The various other kind are lateral "drifting" arm awnings with less frame structure. They utilize horizontal awning assistance arms installed only near the top of the motor home.
There is argument as to which frame and operating design is better. However, we will not open that RVing can-of-worms right here! Please enter a valid email address. A mistake occurred. Please attempt again later on. RVers enjoy their awnings for numerous reasons: motor home awnings give comfort and color from the hot summertime sunlight.
That old stating likewise uses to your RV awning. To prolong the life of your awning, and keep it looking good, routine maintenance and cleaning is necessary.
As your Motor home rolls down the highway, absorbing every bump, crack, and pit, points can loosen up over time. Many awnings have modification screws and screws that permit you to set preferred angles for even more or less shade.
Rv Camper Repair West Covina, CA
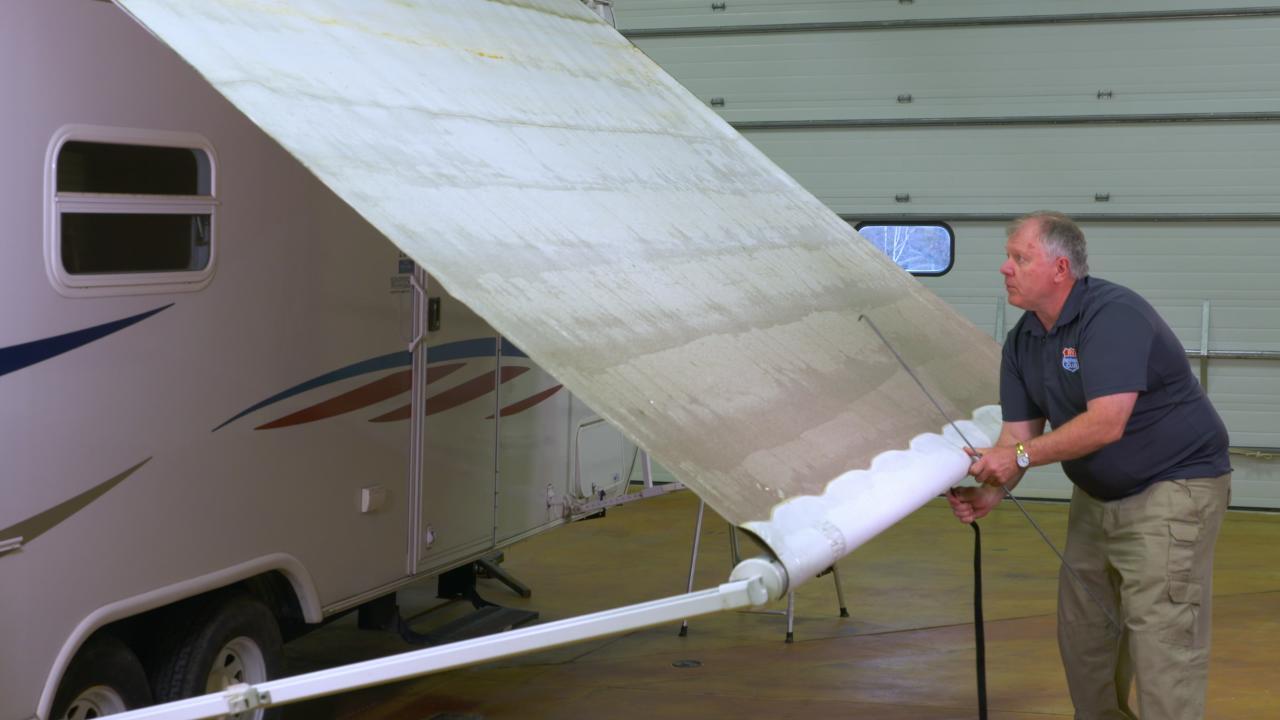
Make sure to put on eye security while seeking out and scrubbing the awning. Rub both the leading and underside of the awning. Light soap or meal soap and water Many gentle for awning material. White vinegar and water combination Equal parts of each. LA's Absolutely Remarkable Cleanser Dilute with cozy water and rinse well.
Repair tape fix for little to medium splits. (Photo: Erik Anderson) A vital very first step is cleaning up the repair service area well to ensure great attachment of the tape or spot.
Make sure your tape or patch doesn't have square edges. Cut the edges in a radius for better long-lasting adhesion. Square edges have a tendency to more conveniently raise up and peel off, shortening the life of your motor home awning repair work. We dislike to think of it, I understand, however sometimes the only point to do is replace your recreational vehicle awning material.
Camper Air Conditioner Repair Near Me West Covina, CA
Preferably, you need to order awning fabric that is heavy responsibility and supplies the best UV security that your budget allows. Be certain to go shopping around.: Purchasing your awning material online may appear most convenient.
You and your assistants will certainly move the new awning material into the upper and reduced channels. Placement it appropriately and protect it in the channels. Bring back tension to the fabric, frame, and roller tube. Examination for appropriate recreational vehicle awning procedure. Adjust textile placing as needed. New material replacement is complete.
As a DIY job, you can save money and feasible loss of usage of your Motor home if you or else required to leave it at a store. Currently it's time to roll out that awning, kick back on your campground in the cool shade, and reeeelax!
Camper Service West Covina, CA
Damages to your recreational vehicle awning can vary from small tears and holes to serious wear that endangers the stability of the material. The approach of repair work usually relies on the severity of the damage and the type of textile. Patching is a common technique of repairing tiny to large rips or holes.
For a simple repair service, ensure the tape covers a location bigger than the damages which the sticky matches your awning's material type. Strings are possibly the very best option for splitting up at the edges or where added stamina is required. This technique is specifically efficient for acrylic awnings, where the breathable textile can withstand needlework without endangering its stability.
Camper Repair Places Near Me West Covina, CA
If the damages is too considerable to sew or stitch, awning replacement textile may be the only feasible option. Typically when there is hefty mold, the mold, or textile, ends up being fragile and tears in many areas. Substitute awnings provide the chance to update materials or design, boosting the look and performance of your recreational vehicle.
I suspect it's ideal at the side that is still showing when the awning is rolled up. Another choice might be if you can discover a furniture or canvas shop ready to do it, you can possibly take the fabric off (google for directions) and have them reduce off the damaged component and resew the "bead" (actually called "Keder welt") back on to it.
Ideally, you can capture yours before the product or assistances are to the factor of needing substitute. Most likely, if a slit is much less than three feet, you can fix the product. If that's the case, begin your troubleshooting by evaluating the dimension of Recreational vehicle awning repair service needed listed below.
Make an awning inspection before any type of camping trip. Start any type of assessment by washing the awning on both the underside and topside.
Camper Service West Covina, CA
Don't make use of just any tape however, in the future, we advise a few kinds of tape to utilize. Tent patch packages work great for awning material. For little holes and splits, tape repair work can in some cases last years, relying on what caused the damages. Gradually, awning textiles or stitching damage in the sun and will become weak.
Discover matching material to cover the tear, and make use of heavy-duty adhesive that works with your textile. Usually, this is a vinyl concrete. Bonds in Tough Problems You can apply our American madeSturdy and Adaptable Our very regarded HH-66 Plastic CementRepair Numerous Sorts Of Plastic Use HH-66 Vinyl Concrete forSometimes, if the sewing string is not UV-resistant sufficient, it can fail initially.
If the damage is also considerable to fix thoroughly, you might have to change the whole awning fabric item. Doing an online search will produce how-to videos you can follow to Do it yourself awning fabric replacement.
Offered that there are so many different kinds of awnings we can not cover each here, yet once again a google and youtube search typically will generate excellent Do it yourself results. If your repair work is just a small opening there are a couple of specialized awning repair service tapes that work pretty well.
Camper Services West Covina, CA
Sale Fix TEARS & RIPS IN AWNINGS, CANVAS, TENTS & EVEN MORE: Our clearWATERPROOF & WEATHER RESISTANT: Our textile repair work tape works as aULTRA-DURABLE & FLEXIBLE YET RIP RESISTANT: Our clear fabricFor bigger fixings, a bigger stronger tape is recommended. We highly recommend gorilla tape weatherproof clear 4-inch broad tape (West Covina Camper Trailer Repair Near Me). This things is extremely sticky and strong and stands up to all weather and water
Rain will run straight off it, however let the awning dry thoroughly prior to rolling it up, as entraped moisture is the perfect environment for mold. The expense of vinyl substitute can run from $150 to over $1,000 relying on the dimension and thickness of the product. This awning mattress topper may be prolonged by trimming the torn sides and taping them, however most likely, the sunlight damages is excessive, and it will need replacing.
This appeared terrific for the selection of outdoor camping conditions we locate ourselves in. And also, their items feature a 5-year service warranty, must last 10 to 15 years, and are made in Brush Prairie, Washington, USA. Difficult Top Awnings likewise provides price quotes right on their website after you complete some dimensions and specs, plus any type of devices you need for your setup.
Camper Roof Repair West Covina, CA
Prices are going to vary according to the high quality, product type, and dimension of your awning. Vinyl and acrylic fabrics cost about the very same per square backyard, differing from $150 to $400 for slide awnings and $450 to $1,200 for complete awnings, depending on dimension and density.

Find matching textile to cover the tear, and utilize heavy-duty adhesive that works with your fabric. Usually, this is a vinyl concrete. Bonds in Difficult Conditions You can apply our American madeSturdy and Versatile Our extremely related to HH-66 Plastic CementRepair Numerous Types of Vinyl Use HH-66 Vinyl Cement forSometimes, if the sewing thread is not UV-resistant sufficient, it can fall short.
If the damages is also substantial to fix thoroughly, you may have to replace the entire awning fabric piece. Doing an on the internet search will certainly yield how-to video clips you can follow to DIY awning textile replacement.
Camping Repair Near Me West Covina, CA
Given that there are many various kinds of awnings we can not cover each here, yet once more a google and youtube search typically will yield excellent DIY results. Consider These Cool Girard Motor Home Awnings That Have No Assistance Arms for your motor home. If your repair work is only a little hole there are a couple of committed awning fixing tapes that work quite well.
Sale REPAIRS TEARS & RIPS IN AWNINGS, CANVAS, TENTS & MORE: Our clearWATERPROOF & WEATHER CONDITION RESISTANT: Our fabric repair work tape works as aULTRA-DURABLE & FLEXIBLE YET TEAR RESISTANT: Our clear fabricFor bigger repair services, a larger stronger tape is recommended. We very suggest gorilla tape weatherproof clear 4-inch vast tape. This stuff is extremely sticky and strong and holds up to all weather and water.
Rainfall will certainly run straight off it, but allow the awning completely dry completely prior to rolling it up, as caught dampness is the perfect setting for mold and mildew. The expense of vinyl replacement can range from $150 to over $1,000 relying on the dimension and thickness of the material. This awning mattress topper could be prolonged by trimming the torn sides and taping them, yet probably, the sun damage is also much, and it will certainly require replacing.
This seemed terrific for the range of outdoor camping conditions we discover ourselves in. Plus, their products feature a 5-year guarantee, need to last 10 to 15 years, and are made in Brush Savanna, Washington, United States. Tough Leading Awnings also gives quotes right on their website after you fill out some dimensions and specs, plus any accessories you need for your installation.
Pop Up Camper Repair West Covina, CA
This business has additionally established a fantastic record of superb quality products and customer solution. Rates are mosting likely to differ according to the high quality, material type, and size of your awning. This is the exact same for your slide mattress toppers. Plastic and acrylic fabrics cost regarding the same per square backyard, differing from $150 to $400 for slide awnings and $450 to $1,200 for full awnings, depending on dimension and thickness.
Camper Roof Repair Near Me West Covina, CARv Camper Ac Repair West Covina, CA
Camper Services West Covina, CA
Rv Camper Ac Repair West Covina, CA
Camper Service West Covina, CA
Camper Repair Near Me West Covina, CA
Rv Camper Ac Repair West Covina, CA
Camper Repair Shop West Covina, CA
Camper Trailer Repair Near Me West Covina, CA
Camper Awning Repair West Covina, CA
Pop Up Camper Repair West Covina, CA
Camper Repair Shops Near Me West Covina, CA
Camper Repair Shops Near Me West Covina, CA
Camper Repair Shop West Covina, CA
Camper Repair Places Near Me West Covina, CA
Camper Service Near Me West Covina, CA
Camper Trailer Repair West Covina, CA
Camper Roof Repair West Covina, CA
Rv Camper Repair Near Me West Covina, CA
Camper Awning Replacement West Covina, CA
Camper Service West Covina, CA
Rv Camper Repair Near Me West Covina, CA
Camper Repair Shop Near Me West Covina, CA
Camper Repair Shop West Covina, CA
Camper Repair And Service West Covina, CA
Camper Repair Near Me West Covina, CA
Camper Service Near Me West Covina, CA
Camper Repair Places Near Me West Covina, CA
Camper Awning Repair West Covina, CA
Rv Camper Ac Repair West Covina, CA
Camper Repair And Service West Covina, CA
Camper Service Center West Covina, CA
Camper Trailer Repair Near Me West Covina, CA
Camper Repair Shop Near Me West Covina, CA
Camper Repair And Service West Covina, CA
Camper Services West Covina, CA
Pop Up Camper Roof Replacement West Covina, CA
Camper Repair Shops Near Me West Covina, CA
Camper Roof Repair Near Me West Covina, CA
Camper Roof Replacement West Covina, CA
Pop Up Camper Repair Near Me West Covina, CA
Camper Trailer Repair Near Me West Covina, CA
Camper Air Conditioner Repair Near Me West Covina, CA
Camper Services West Covina, CA
Rv Camper Ac Repair West Covina, CA
Camper Trailer Repair West Covina, CA
Camper Trailer Repair Near Me West Covina, CA
Camper Repair Shops Near Me West Covina, CA
Rv Camper Repair West Covina, CA
Camper Trailer Service Near Me West Covina, CA
Camper Trailer Service Near Me West Covina, CA
Camper Service And Repair West Covina, CA
Camper Service And Repair West Covina, CA
Camper Repair Shop Near Me West Covina, CA
Camper Service Center West Covina, CA
Camper Repair Shop Near Me West Covina, CA
Pop Up Camper Repair West Covina, CA
Camper Roof Replacement West Covina, CA
Camper Repair West Covina, CA
Camper Air Conditioner Repair Near Me West Covina, CA
Camper Service And Repair West Covina, CA
Camper Air Conditioner Repair Near Me West Covina, CA
Camper Repair Shop West Covina, CA
Pop Up Camper Repair West Covina, CA
Pop Up Camper Roof Repair West Covina, CA
Camper Repair And Service West Covina, CA
Camper Trailer Repair Near Me West Covina, CA
Camper Repair Places Near Me West Covina, CA
Camper Repair Near Me West Covina, CA
Camper Services West Covina, CA
Camper Roof Repair Near Me West Covina, CA
Rv Camper Repair Near Me West Covina, CA
Camper Trailer Service Near Me West Covina, CA
Camper Repair Places Near Me West Covina, CA
Camper Repair Shop Near Me West Covina, CA
Rv Camper Repair West Covina, CA
Camper Roof Repair West Covina, CA
Camper Repair Places Near Me West Covina, CA
In My Area Seo Firm West Covina, CA
Best Seo Citations West Covina, CA
OCRV Center
Table of Contents
- – Camper Roof Replacement West Covina, CA
- – OCRV Center
- – Camper Service Near Me West Covina, CA
- – Camper Awning Replacement West Covina, CA
- – Camper Repair Shop Near Me West Covina, CA
- – Rv Camper Repair West Covina, CA
- – Camper Air Conditioner Repair Near Me West C...
- – Camper Service West Covina, CA
- – Camper Repair Places Near Me West Covina, CA
- – Camper Service West Covina, CA
- – Camper Services West Covina, CA
- – Camper Roof Repair West Covina, CA
- – Camping Repair Near Me West Covina, CA
- – Pop Up Camper Repair West Covina, CA
- – OCRV Center
Latest Posts
Senior Pictures Photographers Upland
Desert Hot Springs Service For Seniors
Mecca Home Health Agencies
More
Latest Posts
Senior Pictures Photographers Upland
Desert Hot Springs Service For Seniors
Mecca Home Health Agencies