All Categories
Featured
Table of Contents
- – Rv Paint Shop Near Me Walnut, CA
- – OCRV Center
- – Rv Paint Shops Near Me Walnut, CA
- – Custom Painted Motorhomes Walnut, CA
- – Painting An Rv Walnut, CA
- – Rv Paint Walnut, CA
- – Motorhome Paint Repair Walnut, CA
- – Motorhome Painting Walnut, CA
- – Motorhome Custom Paint Jobs Walnut, CA
- – Paint Rv Walnut, CA
- – Motorhome Paint Repair Walnut, CA
- – Rv Painter Walnut, CA
- – OCRV Center
Rv Paint Shop Near Me Walnut, CA
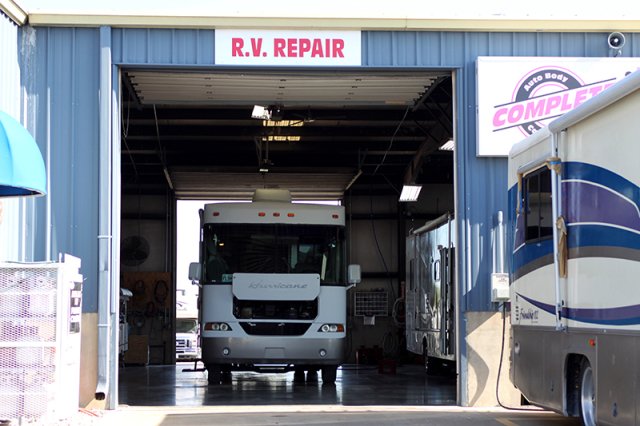
Found in Sacramento, Rehorn Motor Home Crash Center is pleased to serve you as the leader in RV and motorhome collision repair service in northern California. Our center is built to house a few of the biggest Motor homes, motorhomes, and trailers. There is no task also large for our certified repair service specialists and painters whose primary emphasis is to return your motor home or motorhome to pre-accident condition.
This permits us to be so confident in our job that we hold the ideal warranty in the organization with our lifetime warranty. Our workplace team will certainly keep you updated during the entire service and repair work procedure and make certain to let you know of any rate modifications or timespan modifications.
Rv Paint Shops Near Me Walnut, CA
If you have actually been in an accident bring your recreational vehicle or motorhome to Rehorn recreational vehicle Crash Facility and we will certainly care for the rest. We service all recreational vehicle makes consisting of Winnebago, Fleetwood, Tiffin, Keystone, Monaco, and much more! RECREATIONAL VEHICLE & Motorhome Solutions we often supply include: Hail damage and roof covering leak repair services Roofing repair/replacement: rubber, steel, fiberglass Awning repair and substitute Windshield, home window and glass replacement Vent replacement Weather-strip replacement Pop out/slide out repair service Construction, substitute, and repair of metal and light weight aluminum compartment doors and door frames Personalized color matching and paint protection film Custom paint, stickers, and striping Graffiti elimination and criminal damage repair work Delaminating and fiberglass Repair works Fire and smoke damages Fiberglass front and back cap substitutes Timber dry rot repair service Welding House siding, including: Filon side wall surface fixing/ replacements and light weight aluminum skin J-Panel replacement Shade sanding and polishing Come see why clients remain to bring their recreational vehicle's and Motorhomes to Rehorn Recreational Vehicle Crash Center!.
Whether it is a collision repair work or if you're aiming to fix up your rig, Representations Vehicle Body Fixing Ltd in Chilliwack, BC, can aid you out. We have experience fixing and painting all sizes and constructs from motorhomes. With a 60 foot paint booth we have the ability to suit the greatest of buses and motorhomes.
Plus, we share leading product suggestions so your camper comes out looking fresh. Over the years, we have effectively refurbished 2 traveling trailers top to bottom and including the outsides. To provide both rigs a fresh new look, this is the outside paint strategy that we advise. Paint Motorhome Exterior Walnut.
Custom Painted Motorhomes Walnut, CA
1 your camper's exterior to remove any kind of dust and road grime. Make sure to get rid of all stickers from areas that you prepare to paint. Never paint over stickers. I recommend utilizing a decal cleaner device to remove any type of stickers conveniently. Make use of a warmth weapon to warm the sticker to ensure that you can pull off the plastic by hand.
Use the concealing paper to enclose bigger areas from the overspray. 4 After you have actually taped off the areas you wish to paint, sand down all areas of the camper that you intend to paint. Use an 80 grit fining sand block and lightly rub the exterior to create a smooth surface.
5 Next, clean down the RV's outside with acetone and a microfiber towel to eliminate any type of oily deposit that may prevent great adhesion. Dust from fining sand will wreck the paint appearance.
Painting An Rv Walnut, CA
If the paint looks unequal after drying, scuff the surface once more and apply an additional layer of paint. Relying on the problem that your RV's exterior was in and how well you performed in your preparation, you might need 2-3 layers of paint for a strong, smooth finish. 10 After the second (or third) layer of paint is completely dry, apply a clear overcoat.
The clear coat will give your paint that finished look and secure the paint from breaking and fading. 11 Currently it's time to appreciate that attractive exterior.
Rv Paint Walnut, CA
Welcome to Rehorn Motor Home Collision Facility, a function developed 16,000 square foot recreational vehicle service and repair service center that is one of the most innovative collision repair center in Northern California, situated in Sacramento. We have constructed a track record for exceeding our consumer's expectations when it involves body and paint fixing for RVs and trailers.
The paint cubicle generally functions as a disinfected framework that will prevent particles and dirt from causing blemishes in the paint procedure. In case you have already tried considering the obsolete and worn-out visual appeals of your RV, it is the ideal time to offer them a transformation. Whether the exterior part of your RV is fading, damaged, scraped or rusted, the specialized paint job of a certified motor home Body Store will transform the appearance of your recreational vehicle.
Motorhome Paint Repair Walnut, CA
It has additionally been confirmed to be a lot more valuable to our environment. Contrasted to the conventional RV paint work, the chemicals and fumes discovered in the paint will certainly be released in the setting that can hurt the setting and lead to air contamination. With a large paint booth, all edges are restricted that will certainly protect against the leak of the chemicals into the environment.
One more known advantage of using the paint cubicle of the Motorhome Collision Fixing is their reliability. The huge paint cubicle supplies the suitable atmosphere to produce a polished and perfect paint work. In instance an individual completes the paint job manually, there is always an opportunity that they will certainly make little blunders despite how careful and seasoned they are, which might result in significant issues in the paint job.
Motorhome Painting Walnut, CA

Paint booths are planned to provide a professional job. This will certainly prevent color variant, splotches, and other issues that you typically encounter when making use of the standard approach in the RV body store.
They also have a strong resistance to corrosion. The paint can hide the dent that is created by the crash. You have a vast variety of choices when you utilize the service of World Vehicle Body. You will certainly have a complete spectrum of color to use on your recreational vehicle.
Motorhome Custom Paint Jobs Walnut, CA
You don't need to select the regular colors that we typically see on various other RVs. You will certainly have the ability to display your one-of-a-kind individuality with the different options that you have.
I did a great deal of research right into DIY motor home exterior paint prior to ultimately dedicating to painting our fiberglass 5th wheel recreational vehicle. We actually lived in the motor home for virtually a year before we repainted the outside, both since motor home exterior paint prep is a BIG work and because I was fretted about just how it would end up.
I'm additionally truly satisfied with the paint we selected and just how we transferred the designs. I'm below to share whatever I discovered with you today! Let's get involved in it, and hopefully you'll entrust some RV exterior paint concepts. First, I feel like we need a previously photo to truly value how worth it this was: Sure came a lengthy way, huh? The very first choice in any type of paint task is choosing whether to DIY it or work with expert painters.
A professional motor home exterior paint task can conveniently set you back $10,000, which may make feeling if you have a newer or extremely costly rig whose worth you intend to keep. For our 2007 Keystone Raptor, that sort of investment didn't make feeling. You might be frightened by paint on such a large scale, yet I'm below to tell you that if you can paint a room and have a high ladder, you can do this.
Paint Rv Walnut, CA
The experts may utilize marine epoxy or automotive paint, which are the longest long-term alternatives. The disadvantages to these are that they're really expensive and come in minimal shades.
We're virtually a year in (and we put our gear with a whole lot in Alaska!.?.!!), and I more than happy to claim that there are only 2 quarter-sized high-use areas that are damaging. We made use of 2 gallons of paint for the base layer and a number of quarts or paint samples for the attractive colors.
An expert looking paint work needs excellent devices, so this is not an area you intend to cut corners. I thought about renting out or purchasing a paint sprayer, yet eventually decided to stick with paint rollers and brushes due to the fact that I'm extra comfy paint in this way. It was a good decision because the finish appeared just fine the means we did it.
Below are the supplies we used: Here are the steps you'll require to require to finish your recreational vehicle outside paint job. Do not cut corners on prep, it's the most vital component. I won't lie to you, this is by much the most awful part. It took us probably 40 hours of heating decals that weren't fractured with a hair clothes dryer and peeling them off.
Motorhome Paint Repair Walnut, CA
(we did our oven exhaust air vent!.?.!!). Re-caulk any type of seams that require it. Get your surface as also as feasible. Simply the lightest of scuffs, don't take layers off. Vacuum and remove the dirt thoroughly. Tape off any components or trim with painters tape. We didn't require to prime individually because the paint we picked was 2-in-1.
Go slow and come back to it the next day if you have to. This was my biggest worry with this project, so I desire to share genuine life pictures! One year later, and I'm really delighted with just how the paint is holding up.
: I truly hurt myself attempting to make a decision whether to repaint our RV outside, and I am SO glad that we did. The way we did it may worry out the Motor home exterior paint purists, but I would certainly 100% do this again.
Affiliate income assists fund our family travel and permits me to keep producing motivating family traveling content for you. I so value when you utilize my links to make purchases you would certainly have made anyway. For even more motor home remodelling, here are some various other blog posts you may like:.
Rv Painter Walnut, CA
Even big-name body store chains might not have the space readily available to service a motor home, however ABC Paint & Body does. We're proud to be the only body shop in the location that handles motor home service, paint and repair work. We recognize the use of light weight aluminum and fiberglass in motor home building, and our paint spray booth is the just one in the city large sufficient to fit a RV.
In the very early 2000's this was a significant issue with a number of recreational vehicle suppliers that acquired their fiberglass from Dow Corning. It wasn't just motor home's as Corvettes additionally endured the exact same issue. Around 2006 a lot of this was resolved and has not been as significant an issue as it was before.
That stated, my 2008 Exploration 40X was always parked outside all year an was the dark paint scheme, yet never revealed any issue with checking. What I have actually continued reading the subject suggests the usual reasons if the resource is localized is something having struck the surface and caused the undercoat to crack at some point causing the surface area paint revealing checking.
Rv Paint And Body Shops Near Me Walnut, CARv Painting Walnut, CA
Paint Motorhome Exterior Walnut, CA
Motorhome Paint Shops Walnut, CA
Motorhome Custom Paint Walnut, CA
Rv Paint Walnut, CA
Rv Paint Repair Walnut, CA
Motorhome Custom Paint Walnut, CA
Painting Fiberglass Motorhome Walnut, CA
Custom Painted Motorhomes Walnut, CA
Motorhome Painting Near Me Walnut, CA
Paint Fiberglass Rv Walnut, CA
Motorhome Paint Shops Walnut, CA
Custom Rv Paint Walnut, CA
Rv Paint And Repair Walnut, CA
Rv Paint Shops Near Me Walnut, CA
Custom Motorhome Paint Jobs Walnut, CA
Motorhome Paint Repair Walnut, CA
Custom Rv Paint Jobs Walnut, CA
Rv Paint And Body Shops Near Me Walnut, CA
Paint Fiberglass Rv Walnut, CA
Painting Rv Walnut, CA
Paint Fiberglass Rv Walnut, CA
Motorhome Paint Shops Walnut, CA
Paint Rv Walnut, CA
Rv Exterior Paint Walnut, CA
Rv Paint Shops Near Me Walnut, CA
Rv Painter Walnut, CA
Rv Paint Walnut, CA
Rv Paint Walnut, CA
Custom Rv Paint Walnut, CA
Painting Rv Walls Walnut, CA
Painting Rv Walnut, CA
Rv Painting Near Me Walnut, CA
Rv Paint Shops Near Me Walnut, CA
Painting Rv Walls Walnut, CA
Rv Paint Walnut, CA
Class A Rv Custom Paint And Repair Walnut, CA
Rv Paint Shop Near Me Walnut, CA
Motorhome Paint Repair Walnut, CA
Rv Paint Job Walnut, CA
Paint Motorhome Exterior Walnut, CA
Paint Motorhome Exterior Walnut, CA
Painting An Rv Walnut, CA
Custom Painted Motorhomes Walnut, CA
Rv Painter Walnut, CA
Rv Paint Shops Near Me Walnut, CA
Rv Paint Repair Walnut, CA
Painting Rv Exterior Walnut, CA
Paint Rv Walnut, CA
Rv Painter Walnut, CA
Paint Fiberglass Rv Walnut, CA
Motorhome Custom Paint Walnut, CA
Motorhome Painting Near Me Walnut, CA
Rv Paint And Repair Walnut, CA
Motorhome Custom Paint Jobs Walnut, CA
Painting Fiberglass Motorhome Walnut, CA
Motorhome Painting Walnut, CA
Rv Paint Shops Near Me Walnut, CA
Rv Painter Walnut, CA
Rv Paint Shop Near Me Walnut, CA
Painting Rv Walnut, CA
Custom Motorhome Paint Jobs Walnut, CA
Paint Motorhome Exterior Walnut, CA
Rv Paint Shops Near Me Walnut, CA
Motorhome Painting Near Me Walnut, CA
Rv Paint And Body Shops Near Me Walnut, CA
Rv Painting Near Me Walnut, CA
Rv Paint Walnut, CA
Custom Rv Paint Jobs Walnut, CA
Rv Paint Job Walnut, CA
Class A Rv Custom Paint And Repair Walnut, CA
Painting Fiberglass Motorhome Walnut, CA
Motorhome Paint Repair Walnut, CA
Custom Painted Motorhomes Walnut, CA
Painting Rv Walls Walnut, CA
Rv Painting Walnut, CA
Painting Rv Exterior Walnut, CA
Find Seo Marketing Company Walnut, CA
Finding A Seo Package Walnut, CA
OCRV Center
Table of Contents
- – Rv Paint Shop Near Me Walnut, CA
- – OCRV Center
- – Rv Paint Shops Near Me Walnut, CA
- – Custom Painted Motorhomes Walnut, CA
- – Painting An Rv Walnut, CA
- – Rv Paint Walnut, CA
- – Motorhome Paint Repair Walnut, CA
- – Motorhome Painting Walnut, CA
- – Motorhome Custom Paint Jobs Walnut, CA
- – Paint Rv Walnut, CA
- – Motorhome Paint Repair Walnut, CA
- – Rv Painter Walnut, CA
- – OCRV Center
Latest Posts
Wedding Photographer Near Me Mission Viejo
Homecare For Seniors Cabazon
Senior Sitter Forest Falls
More
Latest Posts
Wedding Photographer Near Me Mission Viejo
Homecare For Seniors Cabazon
Senior Sitter Forest Falls